
Simplifying Redux with Toolkit: Building a Beginner-Friendly React Project


Hello everyone in my previous post I explained about basics of Redux and how to implement redux using the redux toolkit, but that was just knowledge for getting started, in this post let’s review a project that I built using that knowledge, before beginning a small reminder that this is just a basic redux that does not involve any kind of data fetching from an API.
Introduction to Project
Project name: Notice Board
source code: https://github.com/krishna-saravan/Notice-Board
As the name indicates this project is the web version of a notice board where different authors or users can come and put up a notice on the board and any anonymous user can come and see the notice and react to the notice without knowing who they are. Since this is a basic notice board without any kind of backend or API calls there is no authentication instead there will be a list of users that can be selected while posting (just to keep it simple).
Let’s Get Started
Let's get started by creating a Vite app.
To create a Vite app go to the desired folder and open the terminal on that folder.
Now type in the command npm create vite
It will prompt you to type in the name of the project and select the template.
Name the project anything you want and select React + javascript template
Now open the folder in vs code (or any other IDE ) and open the terminal inside vs code.
Now run npm install this will install the necessary dependencies for the basic react project.
Now run npm install rect-redux @reduxjs/toolkit
The above command will install the redux tool kit for your project and with that the basic installations are done.
Now clean up any unnecessary files from the project and remove the initial boilerplate code from App.jsx
As I have mentioned in the previous post here, start by creating a store, but unlike there here we will create a folder in the src and name it as app inside it create store.jsx, where we will configure our store.
We can create a store anywhere or directly in the main.jsx file itself but to maintain clean code and follow best practices we will do it in the above-mentioned way.
Store configuration
// Store.jsx
Code:
import { configureStore } from '@reduxjs/toolkit'

export const store = configureStore({
    reducer:{
    }
})
Now that we have configured the store now let's import it in the main.jsx and wrap the APP component with Provider.
// main.jsx
Code:
import React from 'react'
import ReactDOM from 'react-dom/client'
import App from './App.jsx'
import './index.css'
import { store } from './app/store'
import { Provider } from 'react-redux'

ReactDOM.createRoot(document.getElementById('root')).render(
  <React.StrictMode>
    <Provider store={store}>
    <App />
    </Provider>
  </React.StrictMode>,
)
Since we created the store in a separate folder now there is no need to make changes to the main.jsx again this is always a good practice to follow.
let’s get started with posts
To start with posts let’s create a folder and name it as features where we store different features of the project like posts and users for this project.
Now inside the features create another folder called posts here we will store all the files related to posts.
Let’s get started with creating slice for posts and defining the reducers.
create a file called PostsSlice.jsx
Note: Here, I have provided the entire code that was built at the end of the project but if you are interested to do this on your own read the below explanation and build it by yourself and use the code as a reference.
// PostsSlice.jsx
Code:
import { createSlice, nanoid } from "@reduxjs/toolkit";
import {sub} from 'date-fns';

const initialState = [
    {
        id:1,
        title: "React",
        content: "This teaches react from the beginning",
        date: sub(new Date(), {minutes: 10}). toISOString(),
        reactions: {
            thumbsUp: 0,
            wow: 0,
            heart: 0,
            rocket: 0,
        }
    },
    {id:2,
        title: "Redux",
        content: "This teaches redux from the beginning",
        date: sub(new Date(), {minutes: 5}). toISOString(),
        reactions: {
            thumbsUp: 0,
            wow: 0,
            heart: 0,
            rocket: 0,
        }
    },

]

const postsSlice = createSlice({
    name: "posts",
    initialState,
    reducers:{
        postAdded: {
                reducer(state,action){
                state.push(action.payload)
        },
        prepare(title,content,userId){
            return{
                payload: {
                    id:nanoid(),
                title,
                content,
                date: new Date().toISOString(),
                userId,
                reactions: {
                    thumbsUp: 0,
                    wow: 0,
                    heart: 0,
                    rocket: 0,
                }
                }
            }
        }
    },
    reactionAdded(state,action){
        const {postId, reaction} = action.payload

        const existingPost = state.find(post => post.id === postId)

        if(existingPost){
            existingPost.reactions[reaction]++
        }
    }
    }
})

export const selectAllPosts = (state) => state.posts;

export const {postAdded, reactionAdded} = postsSlice.actions

export default postsSlice.reducer
In the PostsSlice we have first imported createSlice and nanoid from redux toolkit.
I have created a postsSlice and exported it. The createSlice is a function that takes in an object with intialState, name and an object of reducer functions based upon these it automatically generates action creators and action types that correspond to the state and reducers.
Here in our project, I have defined initialState as a list of objects with each object having the following properties:
id
title
content
date
reactions
note: here reactions are objects that have different reactions such as:
thumbsUp
wow
heart
rocket
i have hard coded the initial state with two such objects because this defines what our post will be and also easy to write code and test UI.
I have two reducer actions one is postAdded and other is reactionAdded which justifies logic as the name itself. But unlike in our previous post where reducers are just functions here if you notice the reducers are objects, we use this type approach to customise our action payload with a prepare callback. The object version of the reducer action must contain two properties one is reducer and prepare callbacks.
The prepare callback lets us customise our payload, over here in our project of notice bord we have used it customise our payload to have all the above mentionted fields of intital post and it is the place where we give our own custom generated id using nanoid and a time stamp using Date, and where as our reducer function takes in action payload and updates the state. A point to note here is that in the above state we have mutated state directly but that is not true beacuse redux tool kit uses immer js under the hood that makes sure that the state is updated purerly and it all happens in the baground, if you want a good understanding of what immer is then hava a look at this.
reactionAdded action adds the particual action when a user clicks on it. To explain the logic in simple terms we send the postID and what type of reaction to the action and using postID we find the post if the post is existing we add the reaction and if not then we do nothing
In the end we do three exports the first export is getAllPosts where we send out a function, we do this so that when ever there is change in the structure of the posts then we will not change file where we get posts but just in the slice itself this helps us a lot and a good practice to have if you are building a complex projects where there will be lot of features and managaning all different states, so instead of doing it indepently do it as in the above mentioned way. The second export is all the reucer actions using postSlice.actions and the the other one is the entire slice with state to provide it to our store.
Now as we have created the main thing which is posts slice we will create a simillar users Slice in a spearate folder in features and in that under users folder.
//usersSlice.jsx
Code:
import { createSlice } from "@reduxjs/toolkit"

const initialState = [
    {id: '0', name: 'krishna'},
    {id: '1', name: 'satya'},
    {id: '2', name:'saravan'}

]

const UsersSlice = createSlice({
    name: 'users',
    initialState,
    reducers:{}
})

export const selectAllUsers = (state) => state.users;

export default UsersSlice.reducer;
This is simillar to the postsSlice.
Now lets provide the reducers to our store.
//Store.jsx
Code:
import { configureStore } from '@reduxjs/toolkit'
import postReducer from '../features/posts/postsSlice'
import userReducer from '../features/users/UsersSlice'

export const store = configureStore({
    reducer:{
        posts: postReducer,
        users: userReducer
    }
})
Now create a form to use so that we can add the post to our notice board
//PostForm.jsx
Code:
import { useState } from "react";
import { useDispatch, useSelector } from "react-redux";
import {postAdded} from './postsSlice';
import { selectAllUsers} from "../users/UsersSlice";

import React from 'react'

const AddPostForm = () => {

    const [title, setTitle] = useState('')
    const [content, setContent] = useState('')
    const [userId, setUserId] = useState('')

    const users = useSelector(selectAllUsers)

    const onTitleChange = e => setTitle(e.target.value)
    const onContentChange = e => setContent(e.target.value)
    const onAuthorChange = e => setUserId(e.target.value)

    const dispatch = useDispatch()
    const onSavePostClicked = () => {
        if (title && content) {
            dispatch(
                postAdded(title, content,userId)
            )
            setTitle('')
            setContent('')
        }
    }

    const canSave = Boolean(title) && Boolean(content) &&(userId)

    const userOptions = users.map((user) => (
        <option key={user.id} value={user.id}> {user.name}</option>
    ))


  return (
    <section>
        <h2>Add new posts</h2>

        <form>
            <label htmlFor="postTitle">Title</label>
            <input
                type="text"
                id="postTitle"
                name="postTitle"
                value={title}
                onChange={onTitleChange}
            ></input>

            <label htmlFor="postAuthor">Author:</label>
            <select id="postAuthor" value={userId} onChange={onAuthorChange}>
                <option value=""></option>
                {userOptions}
            </select>


            <label htmlFor="postContent">content</label>
            <textarea
                id="postContent"
                name="postContent"
                value={content}
                onChange={onContentChange}
            ></textarea>

            <button type="button" disabled = {!canSave} onClick={onSavePostClicked}>Save post</button>
        </form>
    </section>
  )
}

export default AddPostForm
Over here in the PostForm we have defined an individual states for our respective form feilds and with, we defined it here using useState instead of creating a slice because these form states are just required in this particular component not in our entire app so we don't create a slice but define everything here it the component. First here we import useSelector and useDispatch from the react-redux package and selectAllusers from usersSlice and postedAdded action form postsSlice.
Here we have defined a regular form and we have extracted users using selectAllUsers in useSelector after that we have defined a logic in canSave variable which returns true only if all the Title, author and content is present with that we can disable or enable button. now since we have all the form feilds filled we will use our dispatch function to send the data to our store using postAdded action from postsSlice.
//ReactionButtons.jsx
Code:
import { useDispatch } from "react-redux";

import { reactionAdded } from "./postsSlice";


const reactionEmoji = {
    thumbsUp: '👍',
    wow: '😮',
    heart: '❤️',
    rocket: '🚀'
}

const ReactionButtons = ({post}) => {

    const dispatch = useDispatch();
    const reactionButtons = Object.entries(reactionEmoji).map(([name,emoji]) => {
        return(
            <button
            key={name}
            type="button"
            className="reactionButton"
            onClick={() => dispatch(reactionAdded({postId: post.id, reaction: name}))}
            >
                {emoji} {post.reactions[name]}
            </button>
        )
    })
  return (
    <div>{reactionButtons}</div>
  )
}

export default ReactionButton
Here we have sent our post as prop and defined our reaction butoons using emojis and we have displayed it in the UI as buttons and now I have defined an on click event which triggers a rectionAdded action using dispatch go through the above code.
Next we we have a two other UI components for the posts which we handel individually they are TimeAgo and PostAuthor these combined we form a postList component where we display all the posts
//TimeAgo.jsx
Code:
import { parseISO, formatDistanceToNow } from "date-fns";
const TimeAgo = ({timeStamp}) => {
let timeAgo = ''
if(timeStamp){
const date = parseISO(timeStamp)
const timePeriod = formatDistanceToNow(date)
timeAgo = `${timePeriod}`
}
return (
<span title= {timeStamp}>
<i>{timeAgo}</i>
</span>
)
}
export default TimeAgo
//PostAuthor.jsx
code:
import { useSelector } from "react-redux";

import { selectAllUsers } from "../users/UsersSlice";

const PostAuthor = ({userId}) => {

    const users = useSelector(selectAllUsers);

    const author = users.find(user => user.id == userId)

    return <span>by {author? author.name : 'unknown author'}</span>
}

export default PostAuthor
Next up is using all these individual componetns and renderring it our PostsList.
//PostsList.jsx
Code:
import { useSelector } from "react-redux";
import React from 'react'

import { selectAllPosts } from "./postsSlice";
import { selectAllUsers } from "../users/UsersSlice";
import ReactionButtons from "./ReactionButtons";

import PostAuthor from "./PostAuthor";
import TimeAgo from "./TimeAgo";

const PostsList = () => {
    const posts = useSelector(selectAllPosts) //we exported all the posts from posts slice
    const orderdPosts = posts.slice().sort((a,b) => b.date.localeCompare(a.date)) // here slice() creates a shallow copy of posts

    const renderdPosts = orderdPosts.map( post => (
        <article key={post.id}>
            <h3>{post.title}</h3>
            <p>{post.content.substring(0,100)}</p>
            <p className="postCredit">
                <PostAuthor userId={post.userId}/>
                <TimeAgo timeStamp={post.date}/>
            </p>

            <ReactionButtons post={post}/>
        </article>
    ))

    return(
        <section>
            <h2>Posts</h2>
            {renderdPosts}
        </section>
    )
}

export default PostsList
Now we nedd to import our PostsList in App.jsx
//App.jsx
Code:
import './App.css'
import PostsList from './features/posts/PostsList'
import AddPostForm from './features/posts/AddPostForm'

function App() {

  return (
    <main className='App'>
      <AddPostForm/>
      <PostsList/>
    </main>
  )
}

export default App
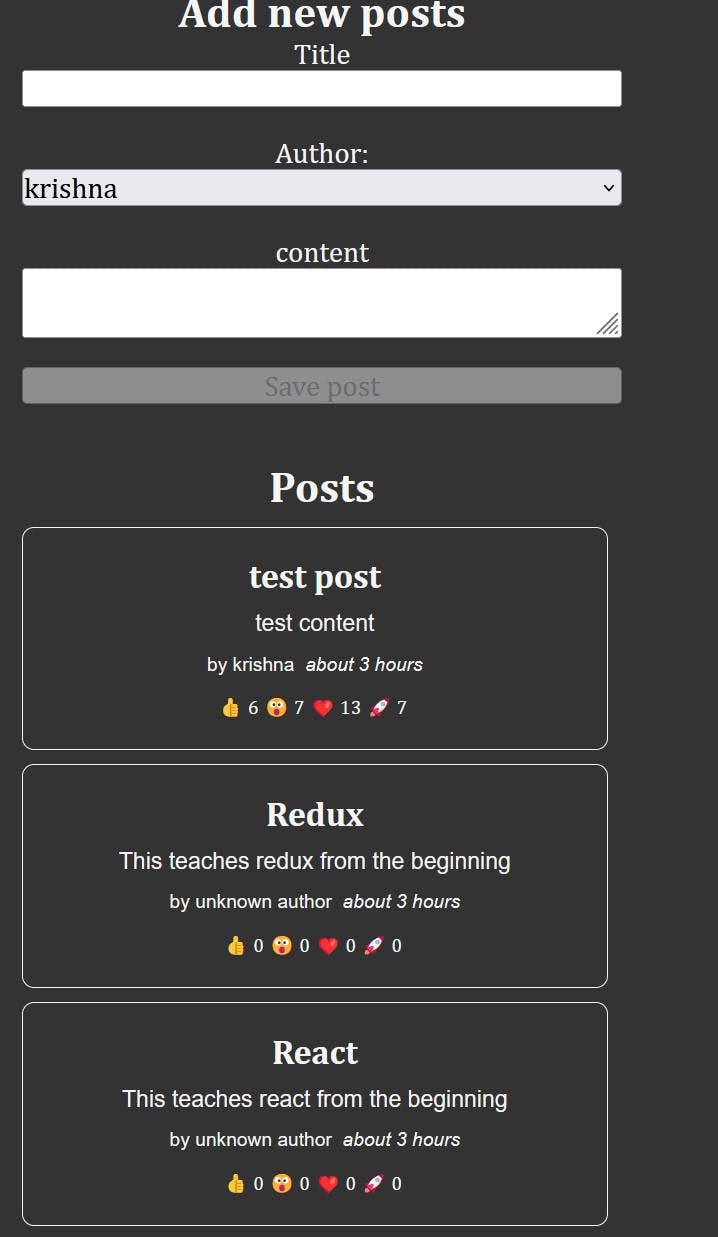
I have also added some css to make look good.
Result:
Thats it for this article now i am modifiying this project using thunk so that it can interact with API's. If you are interested for that follow me here on hashnode, bookmark this blog and leave a like.